How to Share and Extend your Screen Across Windows and Linux
A practical guide to turning another PC into a second display across Windows and Linux using virtual displays, VNC, and game streaming.
Ever wanted to repurpose an old laptop as a second monitor?
I recently went down a massive rabbit hole trying to figure out how to extend my display across different operating systems. Because the resources for my specific setup were so scattered, I spent a few sleepless nights piecing it all together.
To save you the headache, here is a complete guide on how to extend your screen from Windows to Linux, Linux to Linux, and Linux to Windows.
Windows to Windows
This is the easiest scenario. The simplest and most reliable solution is to use Spacedesk.
- Install spacedesk server on host machine
- Install spacedesk client on client machine
- Turn on the spacedesk server on host and connect it on client
This works seamlessly over Wi-Fi or a direct LAN cable. You can even download the Spacedesk app on your Android device to use your phone or tablet as an extra monitor!
General Rule for Cross-Platform Setups
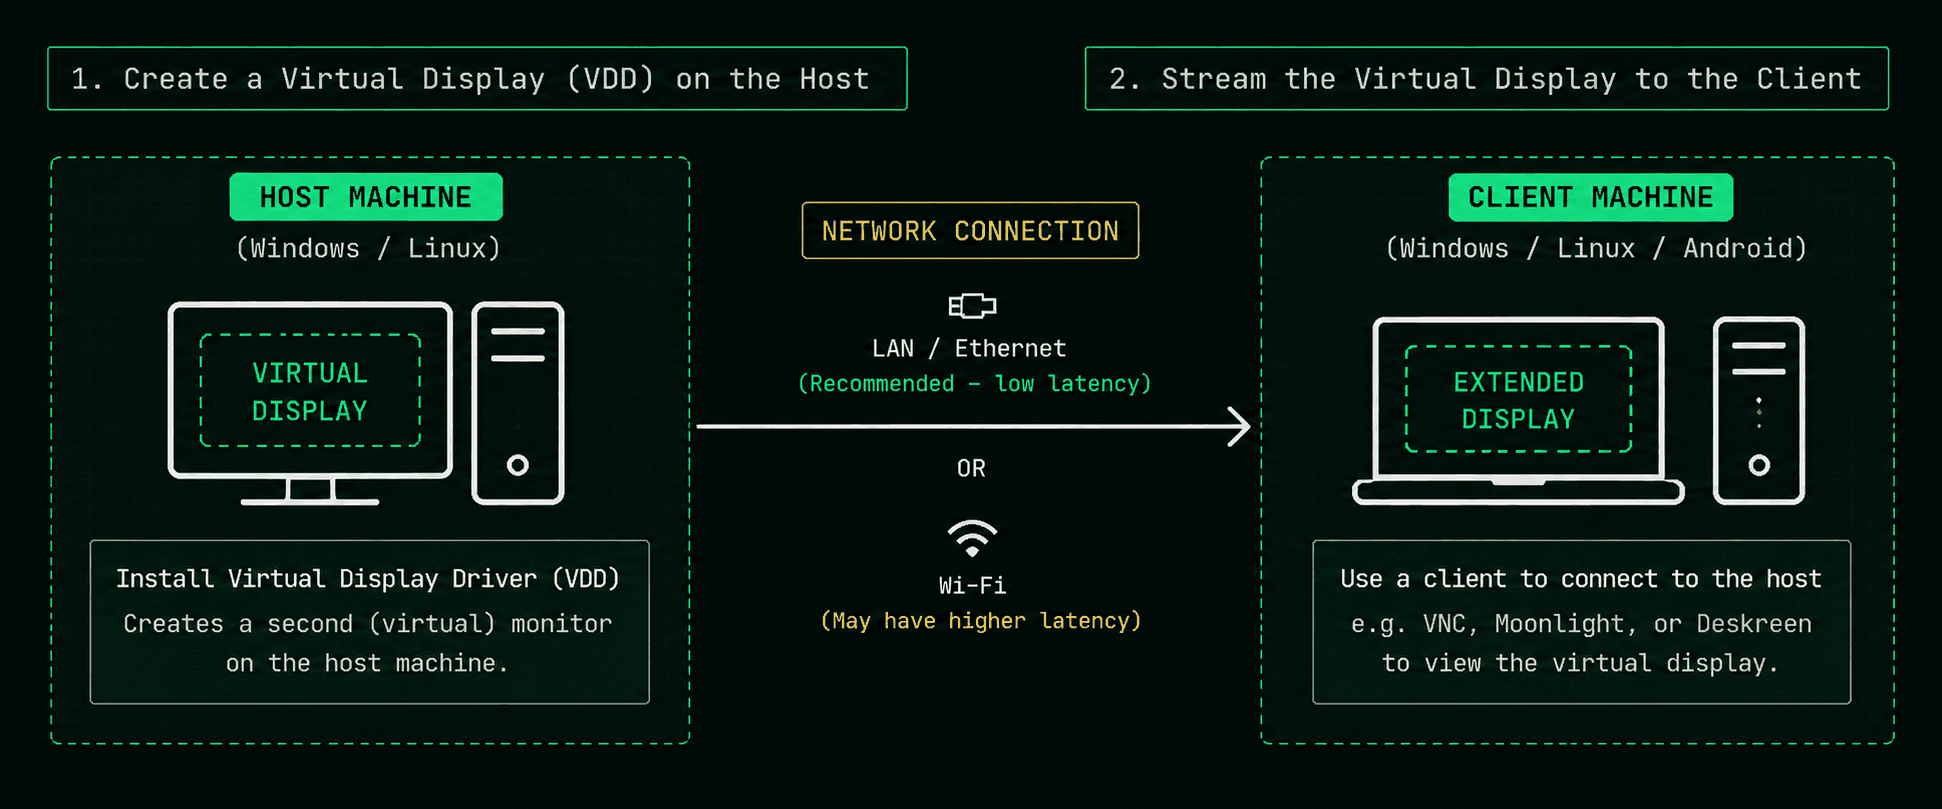
For the other operating system combinations, we generally have to follow a two-step process:
- Create a
Virtual Display Driver (VDD)on the host machine to trick it into thinking a second monitor is plugged in. - Stream that virtual display to the client using a protocol like VNC or a game streaming server.
You can skip the VNC setup and use Deskreen to share a virtual screen if you are using a standard Wi-Fi network. However, in my experience, Deskreen can be finicky over a direct LAN cable connection.
💡TIP:Whenever possible, use an Ethernet/LAN connection between the two machines. A wired connection generally provides lower latency, higher and more consistent bandwidth, and a much smoother experience compared with Wi-Fi.
Windows to Linux
Extending your Windows screen to a Linux machine takes a few extra steps, but it isn't too complicated.
-
Install
Virtual display driver(vdd)for Windows: Check out this video tutorial on how to set it up -
Download and run Sunshine (the server) on your main Windows PC.
-
Download Moonlight (the client) on your secondary Linux PC.
-
Extend the Display in Windows for Display Settings. You'll see two displays. One of them is your dummy display (that's what you want to stream to your client PC)
-
Point Sunshine to the Virtual Screen:
By default, Sunshine captures \\.\DISPLAY1 (your main physical monitor). We need to manually tell it to capture the extended virtual screen instead.
-
Open the Sunshine Web UI on your Windows PC (usually by going to
https://localhost:47990in your browser). -
Click on the Troubleshooting tab.
-
In the logs on this page, look for a list of detected displays. You are looking for a string of text that looks like
\\.\DISPLAY2or\\.\DISPLAY3. Note the exact name of the display that matches the resolution you set in Phase 1. -
Go to the Configuration tab, then click Audio/Video on the left menu.
-
Scroll down to the field labeled
Output Name. -
Type in the exact name of your virtual display (e.g.,
\\.\DISPLAY2). -
Click
Saveat the bottom, and then clickRestarton the left menu for Sunshine to apply the changes.
- Connect via Moonlight on your Linux machine, and you should now get a clean, extended desktop.
If you want to connect via Ethernet cable directly from Windows PC to Linux PC , then you may have to assign static ip to both the machines, otherwise the connection may not work.
Linux to Linux (or Linux to Windows)
This is the trickiest setup.
The Linux ecosystem is extremely diverse, so the method you use depends heavily on your distribution, display server, desktop environment, and compositor.
The first thing you need to determine is whether you are using:
- x11
- Wayland
- Wayland with a specific compositor, such as Hyprland
You can usually check your current session with:
echo $XDG_SESSION_TYPE
This should return either x11 or wayland.
For X11:
Method 1: Using xorg
Manual Way: REFERENCE
Automated script for this setup: REFERENCE
Link to the script mentioned in the automatic way video: SCRIPT
Method 2: Using xrandr (if xorg is not working)
Check this video for more information: LINK
For Wayland:
Wayland is inherently different, but you have options built into certain desktop environments:
- KDE Desktop Sharing: You can use krfb-virtualmonitor to achieve this on KDE Plasma.
Omarchy Linux as main PC
If you are using Omarchy Linux, I have actually built a custom plugin to make this setup significantly easier. You just need to download the plugin and install its dependencies.
👉 Get the Omarchy Virtual Display Plugin here: Omarchy plugin
For other Arch Linux setups you can check this post: REFERENCE
My Personal Frankenstein Setup
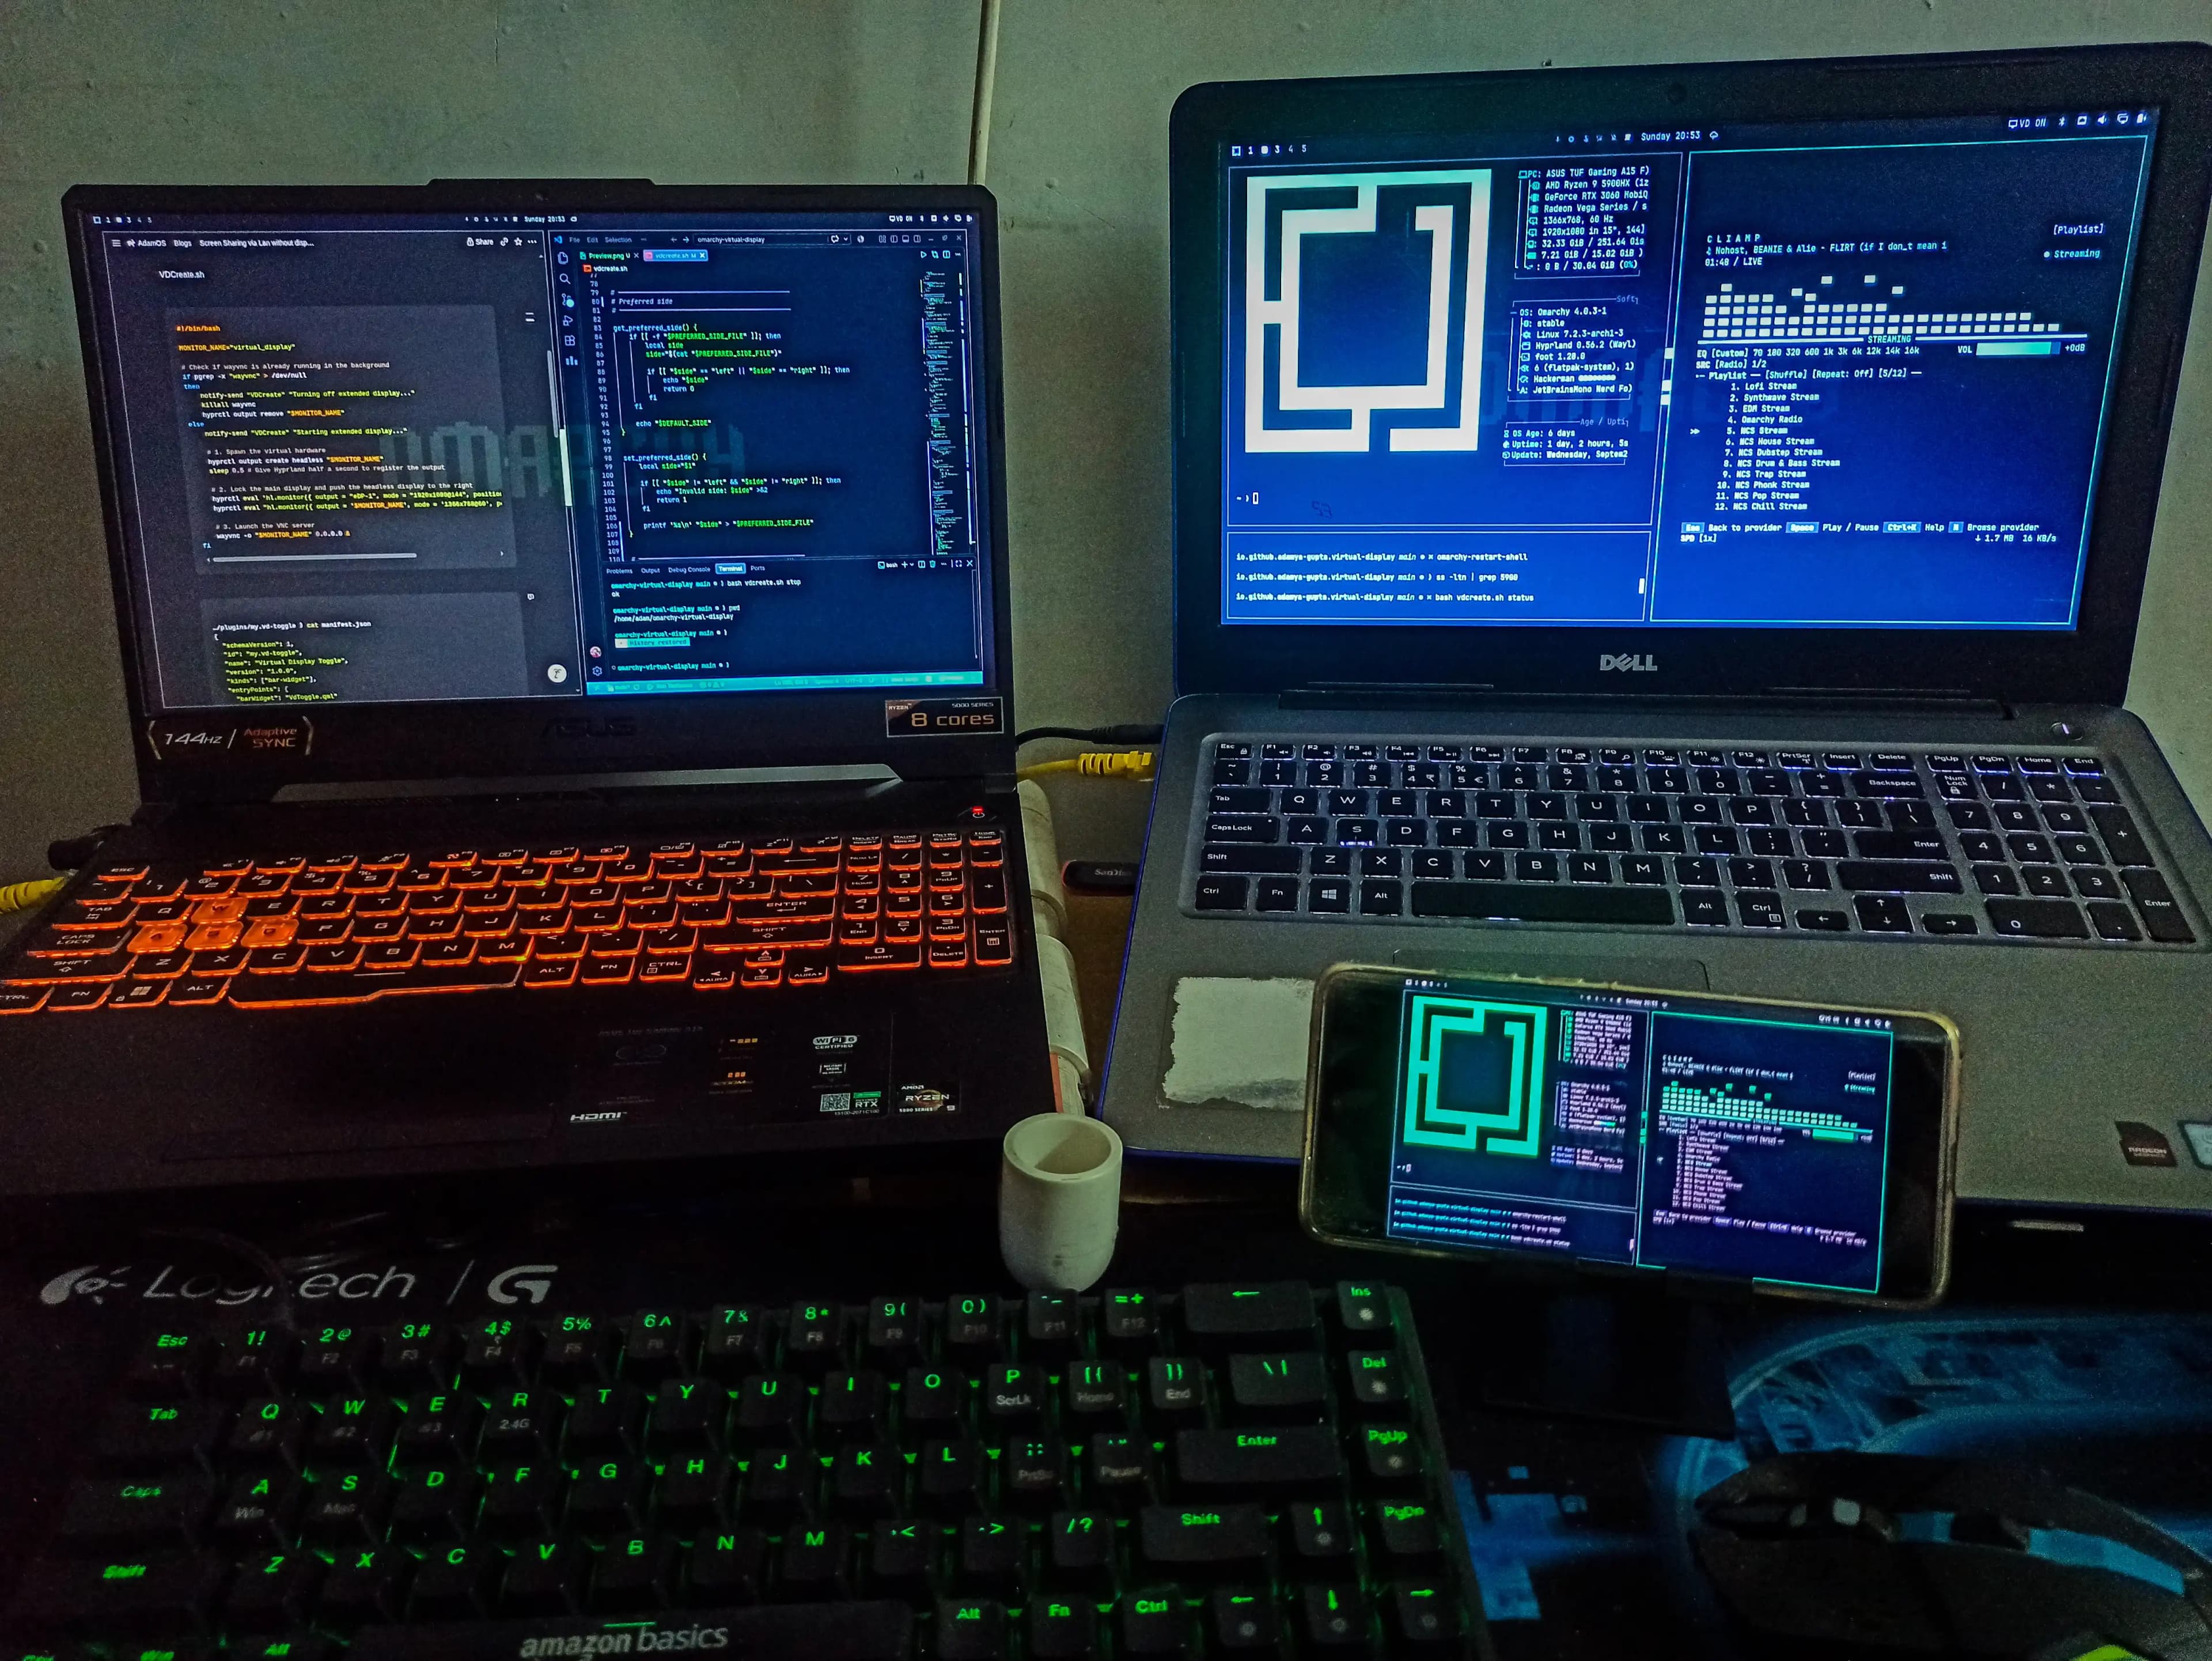
To give you an idea of why I went this deep, here is my current daily driver setup:
- Main PC: Asus TUF A15 Laptop (16GB RAM)
- Second PC: An old Dell laptop (8GB RAM, no SSD or HDD, dead Wi-Fi/Bluetooth card). It runs
Puppy Linuxentirely out of RAM via a 32GB USB drive!
Because the Dell doesn't have Wi-Fi, I connected both PCs to the same network using a direct LAN cable.
My workflow:
- When my main PC is booted into Windows, I use Sunshine (Host) and Moonlight (Client).
- When I boot into Omarchy Linux, I just trigger my custom plugin and access the screen using TigerVNC on the old Dell laptop.
Bonus: I can also access my extended display from my phone using the AVNC app!
It took quite a bit of trial and error to get this running perfectly, but turning a completely dead, hard-drive-less laptop into a blazing-fast second monitor was incredibly rewarding.
An Easier Alternative: HDMI Dummy Plugs
💰You can avoid most of this complexity if you are willing to spend a little money on an HDMI dummy plug.
HDMI Dummy Plugs:
For relatively little money, you can buy a physical HDMI dummy plug (sometimes called a headless display adapter).
These plugs make the computer think that a physical monitor is connected, which can simplify virtual-display setups on both Windows and Linux. However, what you can do with the simulated display still depends on your operating system, desktop environment, and streaming setup.
Closing Note
This guide is based on the methods I found and tested while trying to make my own setup work. Linux in particular has a lot of different approaches depending on the distribution, display server, desktop environment, and compositor, so there may be better or newer solutions that I have not come across yet.
If you know a better, simpler, or more reliable way to achieve this, feel free to reach out and let me know. I'd be happy to update this guide and share the better approach with others.